If you’re planning to repaint your kitchen cabinets, make sure to clean them before getting started.
Paint doesn’t stick to grease. Prep your kitchen cabinets for a beautiful finish and lasting results.
Paint doesn’t stick to grease. Prep your kitchen cabinets for a beautiful finish and lasting results.
According to the Sleep Foundation, children need to sleep upwards of 17 hours depending on their age. You can learn more about that and see exactly how much sleep on the chart on the Sleep Foundation’s website.We all know the importance of sleep. Any parent or person who does not have a good night’s sleep knows it can cause tiredness, lack of focus, messing with our hunger cues, and increases the risk of accidents. And when your child is in their formative years when they are developing, sleep plays a crucial role in that process.
Kid’s Health does a nice job of summing up the importance of sleep. During sleep, the brain is hard at work organizing and storing information from the day, and the body is repairing itself. Sleep is an amazing process that is very important, so we should work to make the place our children will spend almost half, if not more, of their day a cool and comfortable place to stay. Plus, we want our children to enjoy time spent awake in their rooms, playing and being read, to a pleasurable one. Thus, we thought we would share some ideas and tips for painting your child’s room so it is one they love being in and will never forget.
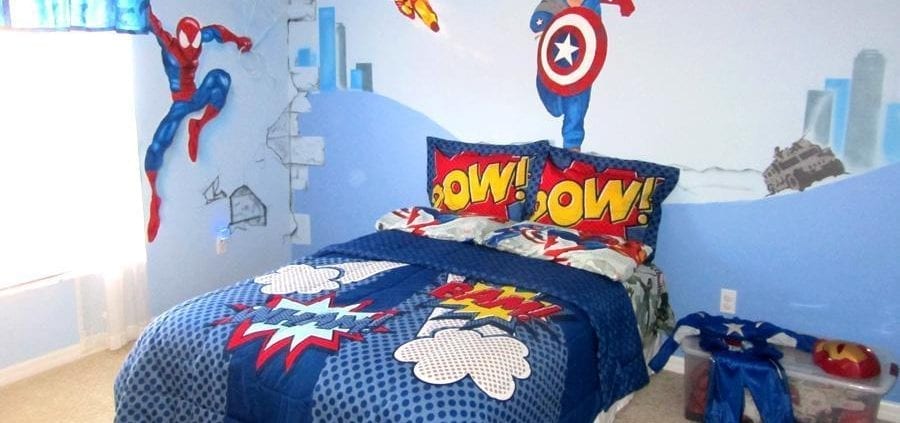
Make it Thematic
As adults we probably can think back to our favorite childhood TV shows and super heros. It is likely your child has some of his or her own. Thus, turning your child’s room into something that represents their absolute favorite toy, show, or otherwise is a great way to make it a fun and warm place to sleep and play. Just like the image above, you can go to any length to create a room that rocks. You can paint scenes from a show, add the characters, and go all out, or you can use decals and posters that blend with the color you paint the room. The sky’s the limit.
Use Calming and Favorite Colors
Colors can have an effect on our mood. Red, for example, can convey aggression while blue can convey calm. Since you want your child’s room to be a place of peace, consider using neutral colors or colors that are friendly and calm. In addition, if your child has a favorite color, be sure to include that as well as it will make the room that much more special.
Wallpaper and More
This can be a great way to make a room feel fresh with ease, and it involves the child. You can put up pieces of wallpaper in strategic locations to give it a certain look. Or, if your child likes to draw on wall, you can use wall paper with a border around it. Even more, you can always put up paint that is erasable or a whiteboard for the child to draw on as well, which will make the room truly theirs.
3D Objects
Making a room with things coming out of the wall can make it an exciting place to be. You can add touches like a kite flying or a super hero’s cape coming out of the wall. This can add a wow factor to a room and make it really fun and bring out your child’s imagination.
Involve the Child
This is your child’s room after all, so involve them in the process. Ask them if you have correctly added their favorite things. Have them help you pick out colors and objects. Let them help paint some if they are old enough. Getting the child to buy into the creation process will help them take ownership over the room and make it truly theirs.
Think back to your childhood room and what you loved about it. You probably can think of at least one thing. That is the lasting impact a room has for a child. It is a memory that lasts forever. Plus, it helps them feel safe and sleep well when done right, which is important. To get more ideas or book a consultation to paint a child’s room, give us a call today!

Learning how to paint a house takes time and technique. We’ve been at it for over thirty years, so we’ve honed our craft. However, if you are trying to improve your house painting skills for weekend projects or to paint a small portion of your house, you may lose yourself trying to find all the right answers to get the job done perfectly. There are resources out there that can make the painting process simpler for you. We have listed five go-to resources you should take advantage of for your next house painting project.
Color House Paint has two valuable resources that help you become a better painter. The first tool lets you decide how much paint you need based on the size of the room. You simply fill in some measurements and it’ll calculate how much paint you need. The second tool will help you choose a color. This service does cost $50, and if you are okay with that, it is like having a distant professional do a consultation for you without visiting. You simply send in pictures of the room and other material and they help suggest what colors might work well in that room. This website is a great resource to help you become a better house painter.
We love the DIY Network because they have informative articles and videos about various painting tips and tricks to help you learn to paint better. From painting techniques to finishes, they have informative articles and instructive videos that are easy to understand and follow. Take a look around and see if you can’t take your house painting project and do it yourself.
You cannot go wrong with the television show that has been a staple of the do-it-yourself crowd for years. Their website is just as enriching as the show itself. With sections dedicated to specific projects, including painting, you can learn so much about caring for or restoring portions of your house. If you need to repaint a brick fireplace, for example, you can learn more about that on their site. If you want to become a better house painter, this is the source to show you how.
Your Local Paint Store
Don’t overlook your local paint store as a great resource for improving your painting. Your local paint store has trained professionals who work in the industry. Not only can they talk to you about your project, they can also show you the tools needed to get it done right as. Nothing, after all, can replace talking to a human being about something as intricate as painting.
If you are wondering what Buzzfeed is, so did we when our children told us about it. Buzzfeed is a very popular website with articles on many topics containing a more visual style. Their articles have more images than words, which makes them easy to browse through and read. It is popular among youth, but the information is very informative, to the point, and engaging. They have paint hacks that can help you become a better painter as well. That is why we love it. It provides a fresh perspective from a creative generation that has much value to offer.
Whether it’s a tool to figure out how much paint you need, a great and established TV show, or a new-aged website, there is no shortage of resources to make you a better house painter. If you need more resources or just want to ask some questions, contact us today!
If you have read any of our blogs so far, or just a little about us, you know we love painting. But, we also take it seriously. Painting carries some inherent risks. From potential falls to paint in your eyes, it can cause injuries. As a company, we are all too aware of injuries that are covered under workman’s compensation laws. While accidents happen, there are ways to keep safe while painting and we wanted to share a few important ones that have kept our injuries and accidents to a minimum and allow us to complete jobs in a reasonable amount of time.
Wear Safety Equipment
You may be thinking that painting involves no equipment. You just roll some brushes on a wall then call it a day. This could not be further from the truth. Painting absolutely requires some standard safety equipment. Aside from wearing clothes you don’t mind getting dirty, wear safety goggles to avoid getting paint in your eyes. Wear knee and elbow pads if you will be on leaning or kneeling for extended periods of time. Also, keep your skin covered so you do not come into contact with harmful chemicals. Most importantly, consider a mask to keep from allowing paint and fumes into your lungs.
You can find common safety equipment at your local paint store.
Use the Right Tools
Imagine trying to paint a ceiling using a kitchen chair. You may find yourself wobbling back and forth and eventually falling. Just like you would not use a frying pan without something to hold the hot handle, you should not paint without the right tools. The proper tools vary depending on the task at hand. Items like ladders will help you easily reach places without risking falling or straining muscles. Using a paint brush with an extended handle will help as well. In some cases, automation can help avoid repetitive use injuries. Before you start painting, give us a call or visit your local paint store to get the right tools for the job to avoid injuries.
Read the Instruction Manuals
Paint brushes may not come with a manual to tell you how to use them. But, paint will have instructions and safety warnings as may some of your protective gear and tools we referenced earlier. Take the time to read this information. It could make the difference between getting hurt or not. Below are some things you may read on paint labels or elsewhere, for example.
● Solvents are highly flammable – keep these paints away from all sources of heat, and never expose directly to an open flame.
● Store in cool, well-ventilated areas.
● Keep these products out of reach of pets and children.
● Dispose of rags properly – rags soaked with oil-based materials can ignite spontaneously if not spread out to dry.
● Ensure good ventilation with open windows and doors.
● Wear protective equipment.
● Keep children and pets out of the painted area.
When painting, it is important to read all instructions so you know what you’re dealing with. Mix the wrong chemicals, store something the wrong way, or try to clean something the wrong way can lead to a negative health outcome. Please take the time to read.
Take Your Time
Painting can have a physical toll on your body. We know. When you only do it once in a while, you feel that toll greater than when your body is accustomed to the rigors of the work. Do not rush your paint job. Take your time and lots of breaks to stretch, rest, and rehydrate. Not doing so can lead to cramps, pulled muscles, and even torn body parts such as rotator cuffs. Yes, painting can send you to the hospital if you are not careful. If you feel an unusual ache or pain, please do not just take some pain medication and push through. Stop and rest until you feel better. What you are painting will be there waiting when you get back.
Painting is fun, but also a serious business. Before you paint consider all the safety protocols that will help make it fun, efficient, and not leave you cursing the experience. Call or email us to ask any questions about painting safety you have!

Painting can be an intimidating and overwhelming experience. Just thinking about it makes some people nauseous. In fact, some avoid painting because it can make you sick if you do not follow certain protocol. Among this gem of knowledge are many others that we get asked about time and time again. We want to help clarify the painting process to help you enjoy it more. We love painting, and we want you to love it just as much. In that vein, below are five of the most commonly asked questions about painting and our responses.
How do I Estimate How Much Paint I Will Need?
While there are a number of factors that come into how much paint you will need, a simple mathematical calculation can help you figure this out. Calculate the square footage of the surfaces you want to paint and divide that by the number of square feet that the manufacturer indicates a gallon of your selected paint will cover.
Estimating Example:
If a room is 10 feet by 20 feet with 8-foot ceilings, your square footage is 480 (the circumference times the ceiling height). If you have a number of windows and doors, subtract the square footage of those openings (standard doors are about 21 square feet, standard windows about 15 square feet). For many paints, including primers and stains, a gallon will cover about 400 square feet (the product label will show the coverage). Since two coats are normally recommended for most projects, two gallons would be needed for the 10-by-20-foot room example. (This assumes there are one or two windows.) Remember, it’s always a good idea to have a little leftover paint for future touchups.
Are There Ideal Conditions to Paint the Exterior of My House In?
It is best to paint in temperatures between 60 and 90 degrees. Otherwise, your drying time is going to be vastly different, which can affect the overall quality of the paint job. In addition, if you paint in high winds, your paint may dry too fast. This not only makes your paint more brittle, but debris and dirt can blow into the wet paint and dry with it. If you can paint in direct shade, that is ideal. Be sure to also check the paint manufacturer’s recommendations.
Is It Always Necessary to Paint Two Coats of Paints on Exterior Painting Work?
It depends. If, for example, you are painting siding where the previous paint has been removed, you will want to apply a coat of primer followed by two coats of paint. However, if the surface has already been painted and the paint is still on it, one coat of paint will do. As always, speak to your local paint supplier or painting contractor about the particulars of your situation.
Should I Use Water-Based Latex Paint or Oil-Based Paint?
Like many aspects of painting, this depends on a few factors as well. While both will do an excellent job, water-based paints are easy to use and easy to clean, which is great for do-it-yourselfers. Plus, latex paints usually have great adhesiveness to most surfaces and are more superior and resistant to bleaching and fading over oil-based paints. However, to figure out which paint will be best for your project, you can give us a call or speak with your local paint supplier.
Do I Need to Prime Every Time I Paint My Walls?
No, you don’t always need primers when repainting. If you’re repainting a similar color, for example, you can lightly scuff-sand the walls to remove any gloss and then clean the surface. Once you have completed that, you can simply repaint over the existing latex coating. You may need to paint more than one coat to keep it uniform. It is, however, important to note that switching sheens or drastic color changes may require a primer to minimize the amount of topcoats used. Moreover, a wall containing stains may be harder to cover. To make sure you have complete coverage, consider using a paint and primer in one product.
Boy, you sure do ask some great questions, and we love answering them. To ask your question or have a consultation on us, contact us today.

Painting your house can be a fun and exciting, if not exhausting, project. Whether you’re painting a room, a wall, or your entire house, painting can be an exciting opportunity to express your creativity, spend time with your family, or get some physical activity. In fact, painting has many benefits. It makes perfect sense, then, that you would want to paint for all the fun and benefits that come along with the project. However, there are some practices people engage in when painting that they may not be aware are damaging. Below are five we want you to avoid so you love painting just as much as we do!
Picking the Wrong Color
This seems obvious at first, but picking the wrong color is probably the most common mistake we see that tanks a painting project. When you pick your paint from a strip of color choices, you may think the paint will look the same on the area you are painting. In many cases, however, the way the paint looks on the wall or outside of the house is different than what you chose. The best thing you can do to avoid this is going to the paint store and asking them to mix a small sample size of the color you want to use. This will help you see what the color you love on paper looks like in real life, saving you both valuable time and money.
Keep a Lid on It
We see this one too much. People keep the lid off the paint thinking it will be easier to access. But inevitably, someone steps in it, on it, or knocks it over, causing an unsightly mess. Combined with lack of proper floor covering, this can become a costly and frustrating disaster. Moreover, your paint will crust and dry, and you are more likely to get paint mixed by putting the wrong lid on the wrong paint. And you may even track paint across your floors after stepping on it. Take the extra second to keep the right lid on the right paint as soon as you stop using it to avoid all of the above messes.
Keep Pets Out
Here is another common mistake that upsets us dearly. We love pets almost as much as painting. We know they are like family members and that you want them to be a part of your project. However, paint can not only be dangerous to your pets, it can also get messy. Imagine a situation where your dog or cat decides your brush is a toy to play with or that paint is fun to lick and roll in. Not only would you get a mess on your pet, your supplies would also be ruined. For the sake of everyone and everything you hold dear, lock your pets out of the area you are painting.
Bumping the Ceiling
When painting, it is easy to touch an area you did not intend to paint with your brush or roller. Even with the same color, this can cause a need for touchups that take time and waste paint. To avoid this, create a buffer zone by painting a 9-inch strip of paint near the ceiling or area you are painting toward.
Over-Brushing
When painting with a brush, the tendency to want to paint the same area more than once to get a smooth and even finish is tempting. This is especially true when the paint is dry. However, doing so can unintentionally lead to unsightly brush marks and ridges, essentially ruining your paint job. So when you are painting woodwork, doors, or cabinets, avoid too much brushwork.
It is the small mistakes that can sabotage your painting project. We love painting too much to see that happen. For a professional painting experience without having to concern yourself with sabotaging your painting work, call us today for a free consultation.

Madonna once sang, “I am a material girl, and I live in a material world.” If we were to re-write those lyrics today, they would read, “I am a digital girl, and I live in a digital world.” As of 2016, according to Statista, the Apple app store had over 2.2 million apps. That is a lot of apps. And when it comes to painting your house, that is not a bad thing. With all the apps, there are many that can help you plan and prepare for a new painting project. Whether you are spot painting, looking to refinish cabinets, painting a single room, or painting the entire interior or exterior of your house, as the saying goes, “There is an app for that.” We wanted to share our five favorite painting apps to help you with your next project.
Color Connect
By Valspar
This app by Valspar lets you explore their paint colors, which are available at Lowe’s, ACE, or independent retailers. The paint calculator helps you estimate how much paint you’ll need for your project.
In addition, you can upload photos and get advice from a color consultant via live video, audio, or e-mail. Plus, The app also provides how-to videos to help get your project off the ground.
Note: You can’t save your paint colors and there’s no search, so navigation can be tricky.
Color Smart
By Behr Mobile
This app comes with a function that lets you search for a shade by name, number, or color family. Plus, you take a picture or select an existing one from your library, and the app will match that color with an existing Behr color.
The app’s preview function allows you to virtually paint a handful of rooms by simply clicking on a color and then the wall you’d like to see the color on. It’s handy to see what the paint looks like in a room. Be careful with this feature though because it’s not your house and the design elements will be very different.
With the Behr app, you can save projects, colors, pallets, and paint calculations so that you can come back to your work later. While we love this for exploring colors and what they may look like in a room, it does not replace trying out paint samples in the actual room you wish to paint.
Paint My Place
Paint My Place is the only app that is not connected to a major paint company. You can explore across three brands: Benjamin Moore, Dulux, and Farrow & Ball.
You can take or upload an existing photo of the space you’re going to paint and paint it virtually. You choose the paint and color to do this with.
However, the painting feature is not the most precise. You may wind up painting a portion of a room or a house object you did not intend to due to the inaccuracy of the feature.
But, this function is designed to give you an idea of what a color is going to look like so in that vein, it is useful.
Note: Being free, the app comes with adds. However, you can upgrade to the paid version for $2.99 and get the option to save work and share it. This is only available for Apple devices.
Color Capture
By Benjamin Moore
The app will match the colors in any photo and also show the next four closest shades.
While you are scanning through the various Benjamin Moore colors, you can save, e-mail, post to Facebook, or tweet out the color you find. You can let your friends on social media help decide what color to use if you like.
Note: The colors look much different on the screen than they do in real life. This is fairly universal with digital paint samples. The brightness and resolution of your screen can play a role in this discrepancy.
Color Snap
By Sherwin-Williams
With Sherwin-Williams’s Color Snap, you can create color palettes and match colors to a photo in your phone. The app’s color-match feature will automatically pick out the colors in the photo that it can match and then create a palette with those colors. The app also allows you to click on a certain color to match and the palette will include a selection of complementary colors.
You can view each color in a room example. Like other apps, it is great to see what a color will look like on a wall, it is just not your wall.
We Love Painting. These apps can help you in your planning and preparation process. Contact us to see how we can make your app creations a reality!
One look at the paint choices for your house painting job can send you into a fainting spell. Colors within a color family cover every possible shade within that family, from very light to dark. Trying to understand this can cause headaches that won’t go away for some time. Add to this all the different styles of painting that exist and it becomes too much to consider. That is why at We Love Painting, we wanted to share 5 ways to choose the right color for your paint job, whether it’s an interior or exterior job.
Start with an Inspiration
This may sound counterintuitive, but don’t pick the paint color first. You want to consider some other things before you pick your paint color. One of them is inspiration. Much like the great artists who look for inspiration in objects, nature, and people, you too can find inspiration everywhere. From online searches and social networks to visiting home shows, inspiration is everywhere. Some people find their color based on a Starbucks coffee color, a blanket for their child, or a design on a plate.
Keep It Neutral
This doesn’t mean you should paint your house a boring color. Decide what you want the focal point of the room or area you are painting to be. If it’s the ceiling, for example, go bold on the sample. If you choose to go bold in one area, then you want to keep the other areas neutral in order to balance things out. Neutral colors work everywhere.
Use Testers
Buy testers in different shades and colors, and paint them in patches to see how they look during different times of the day. Leave them up for at least a week, but beware that testing on white walls can throw the color off. If you have to use larger swatches of color testers, they are widely available at affordable prices. It’s worth the small cost to avoid spending money on gallons of paint and realizing you don’t like your choice. Plus, you can use the testers to touch up smaller areas of your home as well.
Test Against Furniture and Fabrics
Don’t paint your furniture! Instead, paint poster board and place it near your furniture or fabrics. This way you can see what your choice will look like. If it doesn’t match, see if the undertones go nicely with your furniture. You are not painting an empty room and leaving it that way. You want your choice to make everything in the room coordinate or be complemented by it.
Ask for Help
As you can see, this is not an easy choice. It can be vexing at times, so ask for help when you need it. This could mean going into a paint store and speaking to a professional, having a paint company like ours come out for a consultation, or hiring a personal stylist to help you plan. It could also mean speaking to family members or friends and getting their feedback. You don’t have to do this alone to get it right.
We make it a priority to ensure you choose the right paint when you work with us. That’s why we consult with you first, go over your options, show you sample colors, and make recommendations along the way. Contact us to pick your ideal paint color today!

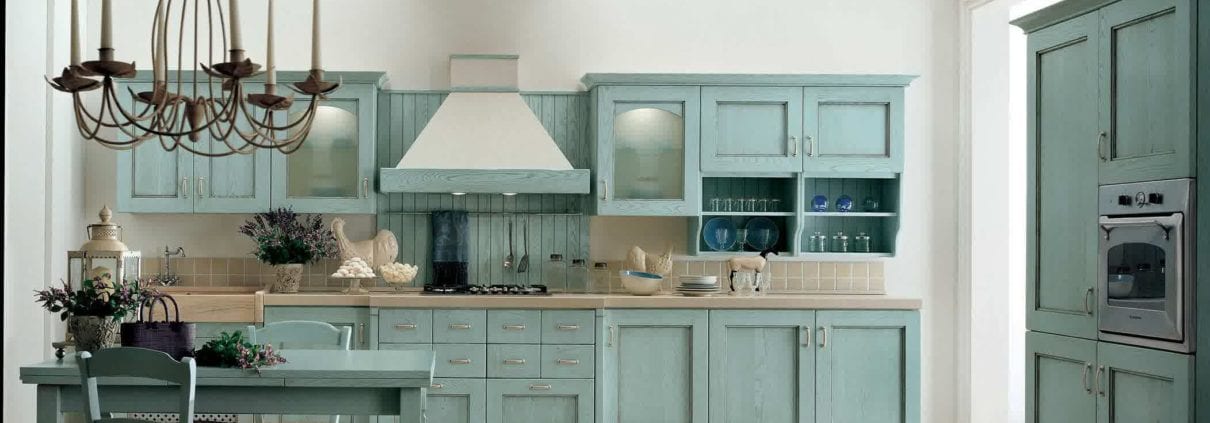
Distressed kitchen cabinets are far from a damsel in distress. This style can be simply worn or truly beat up with a rustic finish adding depth and character to any kitchen.
Distressed Furniture is far from a damsel in distress and has been gaining popularity over the past few years. The technique used in creating distressed wood is not as difficult as it actually sound! The only thing that we need in doing such projects is patience and commitment to a well-organized plan. Plus, the aged look of distressed wood adds a modern elegance to any kitchen design.
Whether it’s simply worn or truly beat up, this rustic finish is made up of layered colors and spattered dark paint (to mimic fly specks). When the paint is dry, you can “distress” the finish by hitting it with a chain and lightly sanding in the spots where cabinets get the most use to reveal the colors underneath. Just remember that the base color will only partially seep through the overcoat and if you want your distressed cabinets to match your kitchen motif, all you have to do is choose colors that will blend well with it.
Jaworski Painting are trained professionals who have decades of experience in various painting techniques and have completed numerous kitchen cabinet painting and refinishing services. Using our free color consultation service, we will work with you to decide on what is the best color options for your kitchen are.
Over a period of 3 working days, we will deliver the best result for your kitchen cabinet makeover to your satisfaction. During this time you will not ned to worry about having to clean out the contents of your cabinets. We will remove, paint and reinstall all the cabinets during the process. You will have a glorious new antiqued kitchen in three working days at a competitive price by the trained professionals, without having to lift a paintbrush.
Get in touch today with Jaworski Painting for a quotation on your new Antiqued kitchen.
How To: Distressed kitchen cabinets finish for your beach home…..
If it is beach weather, it is time for you to be at your beach home. If like me, a beach home is but a pipe-dream and yearn for that perfect beach home feeling, there is an alternative way to achieve this. Using distressed kitchen cabinets, one can incorporate the beach and coastal feel with some elbow grease. Pieces that looks weathered as though they were beaten down by ocean winds and salt spray!
Preparation:
Clean down your cabinets thoroughly with warm soapy water and let them air dry before moving on. Prepare around your cabinets as well by covering your work surfaces and floors with appropriate protective materials. Sand down the cabinets focusing in particular around the corners by some premium sandpaper or a machine sander.
Painting
Now for the fun part – Choose a base color and apply this to the cabinet. You may need to prepare the cabinet with a primer depending on what sort of final effect you desire. You could of course use bare wood instead of base coating. Once your base coat has dried, you can then apply your secondary color. When painting the second color, paint some areas lightly and some heavily to give you an uneven surface finish.
Layering:
In using differing shades of color, such as blues and greens you can provide depth to your piece. For a varied effect, distress the piece with different grades of sand paper. You might also want to beat up your furniture! Well, hammering it softly that is. In any case, make sure that the natural wood shows through here and there.
Finish:
When you have finished painting and it has all dried, grab some sandpaper and roughen up the outer paints to achieve a final finish. Wipe down with a clean cloth to buff up the finish and achieve a beautiful finish.
Voila! You will have a beach house finish without finding sand in every crevice.
Check out www.welovepainting.com as we offer painting and refinishing services for Kitchen Cabinets. Check out samples of our Antiquing, distressed, painting stained cabinets to solid paint colors work on our website.
![]()
SPECIALIZING IN BOTH INTERIOR AND EXTERIOR PAINTING SERVICES AND REMODELLING PROJECTS.
We at Jaworski Painting company are able to offer a wide range of services ranging from kitchen cabinet painting refreshing and restoration, to basic interior and exterior house painting services. Primarily serving Port St Lucie FL, Vero Beach FL, and Fort Pierce FL.